The Seagull Part VIII: Finished!

In the factory, British Seagulls would have been fitted with a decal on the gas tank which included operating instructions, fuel ratios, and the special British Seagull logo. The decal on my Seagull had been scraped off somewhere along the years and there was nothing left of it except part of the ‘B’ and a bit of an ‘L.’ These last remnants were removed when I sandblasted the gas tank. This was probably my most absorbing outboard project so far, and I was motivated to restore the engine to its original appearance. I searched around online and managed to find a replacement decal on eBay. It was sold to me very appropriately by a man in Britain!

Above: The ‘British Seagull’ decal from eBay. In between the “British” and “Seagull” there is the figure of a man, facing away from the viewer. In his left hand, he is carrying a British Seagull and in his right he has over his shoulder a carrying case for a Seagull. If you purchased a Seagull, a carrying case was included.

I used PlastiKote Engine Enamel to protect the paint and add gloss to add some shine. I was very pleased with the results.

British Seagulls were fitted with a rope starter cord, which consisted of a rope and a wooden handle. I sanded the wooden handle and coated it with urethane, since it was in fairly rough condition when I first saw it. Fortunately there were no dents or chips in it. As for the rope, I let it soak in a bucket of laundry detergent and water in an attempt to clean off the years of grease and dirt. When you’re doing restoration it’s always best to try the gentlest methods first, like laundry soap or borax, then work your way up to more caustic solutions (heavy duty cleaners), when all else has failed.

Above: The wooden handle (lower left) after I applied some urethane.

When I attempted to start the Seagull for the first time after restoration, it wouldn’t work. I tried over and over again with no result. Something wasn’t right so I began to troubleshoot. Don’t be disheartened when this happens, because it will occur frequently when you’re working on older engines. The best method when you’re not sure what to do is to work backwards through the systems, and troubleshoot. Sure enough, I soon discovered that the gaps on the points (part of the electrical setup on the motor) were off. The correct gap is 0.020 inches (I looked this up online). Later I thought that I must have moved them when I was dismantling the engine (see what I mean about being careful?). After setting the gap to the correct width, the Seagull started up without any problems whatsoever. Here is a photo of me demonstrating it at our local 4-H fair during showmanship. Note the swanky garbage can full of water!

Above: The Seagull after start up. It worked great!

Now the only thing left to do was to put the Seagull on a boat, like the one my grandfather owns below! I attached the Seagull to the dingy and gave the flywheel a whirl. It took quite a while to get it started and KEEP it running, which I put down to the fact that it had been so long since it had been running in water. Remember this when you’re trying the same thing – and don’t get discouraged. Some of these old engines are finicky and all you can do is be patient and keep trying.

The Seagull was a lot more powerful than I expected! There was quite a wake too, and the water cooling system was working great. Tip: there should be a steady stream of water exiting the block.

Here we are in the bay by my grandfather’s house. Don’t forget your safety equipment: lifejackets and some spare gasoline!

Overall this was a very absorbing and exciting project. It worked well and I was glad it turned out the way it did; I have never been able to achieve the same result with any of my other outboard projects. I guess this comes with experience. The more careful and painstaking one is, the better the result. Rushed work never yields a good product.

When you’re working on projects of this sort, just remember a few things:

— Take your time and be as painstaking as possible. You’ll be glad in the end

— Make sure the parts you replace are the correct size and gauge

— Document the engine dismantling with a camera if you can. This will help you remember what went where, especially if there is a long span of time between taking it apart and putting it back together.

— Search around online or in the library to see if someone has Been There, Done That with a similar project, so you can get some tips or help.

— Check your local Heritage Society for retired machinists, or mechanics, because they are an invaluable resource (and they usually like helping new engine enthusiasts)

— Keep small pieces in plastic containers with lids, so you won’t lose them

— Keep all flammable materials outside, stored safely

— Don’t get discouraged!

The Seagull Part VI: Painting

Why paint an engine?

Painting helps prevent rust and makes an engine look brand new.

Above:  The 1958 Johnson Seahorse.

After sandblasting the next step in restoring the Seagull was to paint it. Before sandblasting the metal surface was smooth, but without any paint it was now a little more coarse, like emery paper. Dirt could easily stick to the metal, and if this happened I would have to sandblast it all over again to get the dirt off. Paint won’t bond to metal if there is any dirt in the way. I had to handle the parts with clean grease free hands to ensure that dirt wouldn’t get into the tiny grooves on the metal.

Painting can be tricky. If too much is applied it will run or drip and the finished result will not look very professional. When I painted the Viking (a past outboard project), I gave it one coat, and when I saw that some places didn’t have enough paint I sprayed it again before the paint had dried. This resulted in large globs of paint in various places and didn’t look very good at all. I had to resand it and repaint it which was very time consuming and quite frustrating. The proper way is to give the object several light coats instead of one thick coating.

Before painting, remove all the old paint. With a small engine, the best tool for the job is a sandblaster. Once the old paint is gone, prime the metal before painting or use rust paint (no primer necessary). Primer helps the paint stick to the metal. It is best to paint on a warm dry day; this will help the paint dry and bond to the metal. If there is too much humidity in the air you run the risk of the paint looking “sticky” or taking ages to dry. I like to use cans of spray paint because you avoid brush marks with spray paint. Make sure you have a large drop sheet or piece of plywood under your project before painting.

Above: Painting the float bowl.

Here’s website that offers some useful advice:
<http://www.oldengine.org/members/murphy/painting.htm&gt;

After painting it’s best to leave the paint to dry for at least a week. Once I left a motor to dry only for one day and the next day I tried to reassemble it. The paint scratched off almost immediately; when I tightened the nuts and bolts, the underside of the bolt would scrape paint off the surface. It was incredibly frustrating. If I had left it to dry for longer it wouldn’t have done this. The paint eventually dried but the finished result was (sadly) amateur looking.

Painting bolts and nuts can look nice, but I find that when they are being removed the ratchet bit can scrape paint off the nut or bolt. One solution is to buy new bolts and bypass painting them altogether. This also avoids the issue of having old nuts crack during reassembly.

Above: Don’t forget to clean the cap off when you’re done painting! Old paint will dry up and block the small opening on the nozzle.

To clear the cap of paint you turn the can downside and spray for a few seconds, until the paint no longer sprays out.

After painting I used PlastiKote engine enamel to seal the surface. This adds gloss and prevents dirt from sticking to the paint. It looks especially nice on gas tanks and flywheels. It also handy if you’re replacing engine decals as it will keep the gasoline from dissolving the decal.


The Seagull Part IV: New Gaskets

Obtaining new gaskets to replace old ones, whether it’s buying a brand new set or making your own, is an important part of restoring a motor. Gaskets seal the space between the components of an engine – increasing the amount of compression necessary for an engine to perform well. Poor gasket = poor compression. The types of gaskets vary: some are thick while some are made with thin metal. It is very important to know which type of gaskets to use on your motor. On the Seagull all gaskets were the same thickness, except for a fat copper gasket which fit between the head and the block. I never replaced this one because it was in good condition. Gaskets generally decay because the heat from the block will ‘melt’ the gasket, causing it to fuse and bond to the block. When you’re removing them you’ll notice that they will often need to be ‘peeled’ off their seating.

I had some leftover gasket material from an outboard I restored a couple of years ago which would work. You can get this sort of material at most automotive shop. Fortunately it was very similar to the Seagull’s original gaskets.

I started by tracing the shape of the object onto the gasket material. There is no right or wrong side with this material (be careful though – this might not be the case with all gasket material). Use a pencil so you can erase it if you make a mistake.  I included screw holes that were on the original gasket.

Above: tracing the lower half of the gearbox.

Above: This tracing job isn’t very good – what line should I follow? I decided to redo and make it more accurate.

After tracing, I cut out the gaskets using a very sharp knife. The gasket material is like cardboard and just as hard to cut. The first time I made gaskets I was a bit hasty and my knife got stuck, then it would slide out of control if I pushed too hard. A definite learning curve and I wasted a lot of material. This time round I took more time and got a better result:

Above: Punching holes for the screws (using a plain old hole punch). I left a space around the trace to account for the lip in the gear box cover (the gray circular object at the top of the photo)

This way it would fit around the lip and not be too small.

The Seagull Part III: Sandblasting

This year I used a tool that I have never used before with any of my projects: a sandblasting cabinet, or glass beading machine. These sorts of machines come in handy for removing rust and paint off metal objects in a short space of time. Sandblasting leaves you with a nice smooth piece of metal, ideal for painting. If old paint is not removed, new paint may flake off and you can see old paint under the new. I don’t own one of these items but I was able to use one that belonged to the grandfather of a friend of mine.

Above: The sandblaster (0r glass beading machine).

Above: Inside – the red plastic piece is the sandblaster (the gun).

Above: The crankcase before sandblasting.

Above: Lower half of crankcase after sandblasting.

How it works:

There are several components to the machine that I used: the sand/glass mixture, the cabinet itself, the sandblaster and the compressor. The cabinet is the big metal box which holds the sand/glass mixture. Connected to the gun is the compressor. It takes in air and then pumps it through a hose to the gun at extremely high pressure (above 80 psi). The magazine on the gun contains a generous amount of sand. As the air flows through the gun it carries the glass/sand mixture with it and blasts from the barrel of the gun at an incredible speed. The operator has to be able to hold the gun while sandblasting, so there are two black gloves which are fastened onto the metal box and won’t come out. They protect the operator’s hands from the tiny sand particles racing around inside the cabinet. There is a little window at the top of the box so you can see where to aim the gun.

Operating Procedures:

  1. Fill the sandblaster with sand
  2. Turn on the compressor
  3. Place the soon-to-be-blasted piece
  4. Close the lid
  5. Start blasting!

Sandblasting is very effective when you have a rusted old motor like the Seagull. Old rust is gone is a matter of minutes, depending on the size of the piece you are sandblasting. Sandblasting it also very fun!

The Seagull Part II: Taking it Apart

A few months after last year’s final 4-H fair I got to work on restoring the Seagull. I began at the beginning: taking it apart. There was a lot of rust, dirt, and the gearbox behind the propeller was full of an ominous looking sludge. I looked like a drop of seawater had gotten in at some point, it’s a good thing there was oil in there or the corrosive salt water would have rusted the gears.

Above: The gear box after I drained most of the sludge.

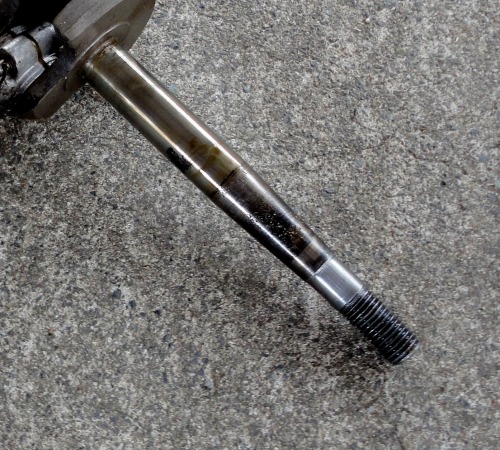
After dismantling the gearbox, I removed the flywheel. The flywheel was stuck tight and it took a lot of hammering (and patience!) to get it out. I spend a five hours hammering, tapping, prying and levering on it, and eventually it gave way. Why the hammer? On small motors the flywheel is bolted onto the crankshaft, which is usually tapered. Hammering gently on the flywheel while a helper pulls up will loosen it from the tapered end.

Above: A hammer is a useful for removing flywheels. Don’t get rough!

Above: One end of the crankshaft. Note the taper.

Many of the bolts were stuck and rusted which made it difficult to take them out. When this problem comes up, be very careful. The last thing you want to do is break a bolt. On British Seagulls the bolts are all Whitworth sizes – somewhere in between metric and imperial – but not quite a perfect fit on either of these sizes. Whitworth wrenches aren’t something you can find at your local Canadian Tire store and buying replacement bolts is difficult too; regular hardware stores don’t carry anything that fits. It’s best to go to a specialist.

Now I had an awkward combination of problems: jammed bolts and tools the wrong size. Eventually, by combing through my grandfather’s tool room I found a bit which fit quite well onto the desired bolt. I carefully loosened the bolt by slowly pushing the rachet back and forth. This can break the corrosion holding a bolt in. I levered the ratchet back and forth, gently, loosening all the rust and dirt around the head of the bolt. Whether it takes one minute or one hour, take your time with this process. You don’t want to break anything!

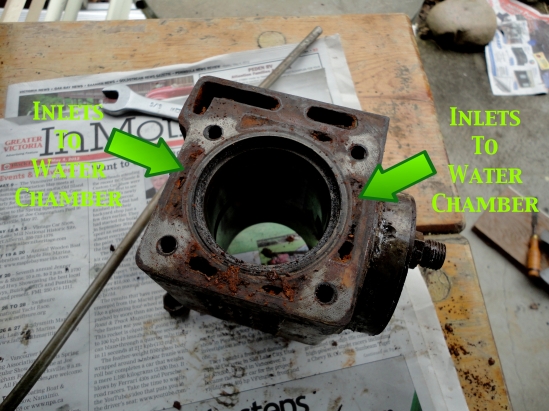
British Seagulls are water cooled: Water from the ocean is drawn in and forced up a pipe by an impeller to the block, where it fills a chamber that encircles the piston. On my Seagull this water chamber was heavily clogged with rust and it was obvious no water was going anywhere. In the photo below the engine head is removed to reveal the four inlets from which you can access the water chamber. This is handy because through these inlets you can see and clean inside the water chamber. The rusty material blocking these inlets is the rust.

Above: The block, note the water chamber inlets. There are four inlets, one on each side.

Above: The inlets to the water chamber – much more visible after sandblasting.

Above: The crankcase. It splits in half, making it easier to take the cams and piston out.

Next, I’ll talk about the fun part: Sandblasting!